Want a unique and eco-friendly fire pit without emptying your wallet? Building one from a repurposed tractor rim is surprisingly easy and looks amazing! This guide blends simple instructions with a compelling narrative, perfect for beginners and experienced DIYers alike. Let's transform scrap metal into a stunning backyard centerpiece. For more tractor rim fire pit ideas, check out this helpful resource: Tractor Rim Fire Pits.
Gathering Your Supplies: A Scrap Yard Adventure
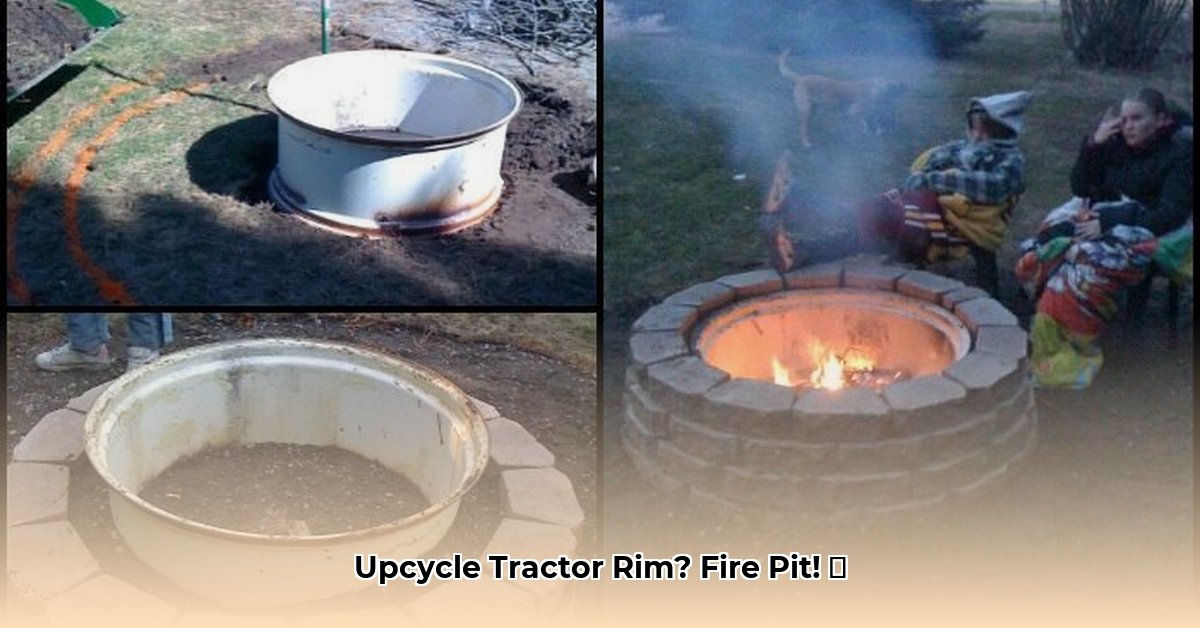
First, you need the star of the show: a used tractor rim! Local scrapyards or farms are excellent hunting grounds. You might even score one for free—talk about a win! Beyond the rim, your shopping list includes:
- Bricks or Stones: Choose enough to create a sturdy ring around the rim. Consider aesthetics—rustic fieldstones, smooth river rocks, or reclaimed bricks all add character. Aim for a substantial amount.
- Sand or Gravel: This provides drainage and stability. A cubic foot or two should suffice.
- Landscape Adhesive (Optional but Highly Recommended): Acts as insurance against shifting, ensuring your brickwork remains solid for years.
- Heat-Resistant Gloves: Essential for protecting your hands from burns while working with hot materials.
- Measuring Tape: For accurate measurements and a professional-looking fire pit.
- Shovel: For digging and moving sand or gravel.
- Level: Ensures your fire pit sits perfectly level—no wobbly bonfires allowed!
Remember to check local regulations regarding fire pits before starting. Safety always comes first!
Prepping the Ground and Your Rim: A Little TLC
Site Selection: Choose a level area in your yard, clearing away grass, weeds, and debris for a clean, stable base. Consider wind patterns to ensure your fire is safe.
Rim Cleaning: If your rim is rusty or has flaking paint, clean it thoroughly. Wire brushing removes loose rust and paint. Safety glasses and a dust mask are crucial during this step. We want a safe and long-lasting fire pit.
Rim Placement: Position your cleaned rim on the chosen spot. Ensure the rim is stable and level—this is crucial for structural integrity!
Building the Base: Layering for Stability
Base Layer: Create a level base using sand or gravel, approximately 2-3 inches deep. This drainage system prevents water accumulation and sinking.
Bricklaying (or Stone Stacking!): Arrange bricks or stones around the rim, forming a neat ring. This fire barrier contains embers, preventing scattering. Take your time; patience yields a professional-looking result. Experiment with different layouts.
Securing the Stones (Optional but Recommended): Apply landscape adhesive to the back of each stone as you place it. Let it dry completely before proceeding; this significantly enhances structural integrity.
Finishing Touches: Polishing Your Masterpiece
Gap Filling: Once the stone ring is complete, fill the gaps with more sand or gravel for a polished look.
Final Inspection: After the adhesive dries, thoroughly inspect your fire pit for stability. Address any issues before lighting your first fire.
Celebration Time: Congratulations! You've built a unique tractor rim fire pit. Enjoy roasting marshmallows and admiring your handiwork.
Safety First: Crucial Fire Pit Precautions
- Fire Extinguisher: Keep one nearby at all times.
- Unattended Fires: Never leave a fire unattended, especially with children or pets present.
- Local Regulations: Always adhere to local fire safety regulations—check with your local fire department.
Personalizing Your Fire Pit: Adding Your Touch
Want to add a personal touch? Use different colored bricks or stones, incorporate metal accents, or embed decorative tiles. A metal screen improves safety and limits sparks. The possibilities are boundless!
This project isn't just about building a fire pit; it's about creating something unique, sustainable, and deeply rewarding. So, gather your supplies, get your hands dirty, and relish the journey!